|
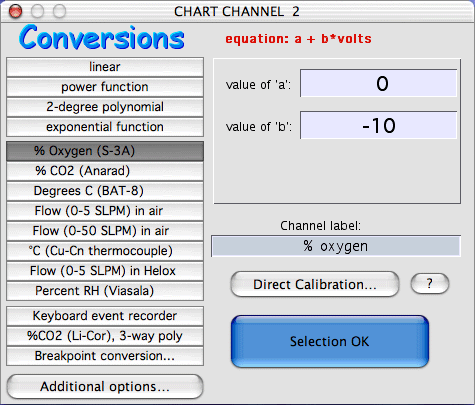
This window lets you specify how raw inputs are converted into
appropriate units (such as speed, temperature, flow rate, gas concentration,
etc.). The standard window looks like this (but note that you can
produce customized buttons using the custom
conversions option in the EDIT
menu):
Occasionally it is necessary to pre-process instrument outputs before
they are read by LabHelper. Common examples are amplification
of low-level signals, applying an offset voltage (sometimes called
"zero suppression"), and using a voltage divider to reduce
a high voltage to one within the limits of the A-D converter.
The Measurement
Guide pages at the Sable Systems website has helpful information
about signal manipulation.
Top of page
Voltage conversions take several forms:
Raw
input voltages volts x 1).
NOTE: oscilloscope channels are used with the raw voltage option only,
in order to reduce processing requirements and speed up the sampling rate.
Power
functions:
value = A + B x (voltsexponent )
If the exponent = 1.0, it is better to use the faster two-order polynomial
option (below).
| CAUTION: if you select a non-integer
exponent and LabHelper reads a negative voltage,
the resulting operation is mathematically meaningless
and the recorded value for that sample is set to zero. Make
sure that a non-integer exponent 'sees' (i.e., is applied to) only positive
voltages! |
two-order
polynomial:
value = A + B x volts + C x (volts2)
Polynomials have several advantages over power functions. They
handle negative voltages easily, and compute much faster than power functions.
exponential:
value = A + B x e(C x volts)
Exponentials accept negative voltages but do not compute as fast as polynomials.
ONE
channel can use a three-order polynomial
conversion:
value = [ A + BxV + CxV2
+ DxV3 ] x E
where V is a scaled
input voltage:
Top of page
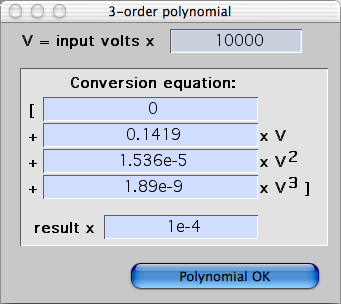 The default polynomial
scaling is conversion of input volts into millivolts (mV, = volts X 1000).
However, you can enter any appropriate conversion factor for input volts.
This is particularly important if you are using a voltage
divider, and your instrument has a pre-defined polynomial
conversion factor. You have to account for the effect of the divider in order
to properly apply the polynomial. Accordingly, the input voltage scaling
factor should incorporate the voltage reduction (and any other needed scaling)
so as to yield the correct output of the instrument.
In this example, the instrument's high output voltage has been reduced by
a factor of 10 by means of a voltage divider and is being multiplied by
10,000 to obtain millivolts. The default polynomial
scaling is conversion of input volts into millivolts (mV, = volts X 1000).
However, you can enter any appropriate conversion factor for input volts.
This is particularly important if you are using a voltage
divider, and your instrument has a pre-defined polynomial
conversion factor. You have to account for the effect of the divider in order
to properly apply the polynomial. Accordingly, the input voltage scaling
factor should incorporate the voltage reduction (and any other needed scaling)
so as to yield the correct output of the instrument.
In this example, the instrument's high output voltage has been reduced by
a factor of 10 by means of a voltage divider and is being multiplied by
10,000 to obtain millivolts.
- The standard button for this option is labeled "%CO2 (LiCor 6251)",
since it was implemented to handle calculation of CO2
concentration from a LiCor 6251 analyzer. The LiCor came with
a factory-defined polynomial conversion based on millivolt output that
needs to be scaled (newer versions of this analyzer have built-in linearizing
circuits and don't need complex conversions). However, with appropriate
changes to the various coefficients, this routine can be used for most
instruments requiring a polynomial conversion.
- Note that a few instruments use a higher-order polynomial for converting
recorder output voltages. Options for these devices include after-the-fact
conversion (in LabAnalyst or another analysis program) or computing
a three-order equivalent of a higher-order polynomial, provided this can
be done with sufficient accuracy.
Keyboard event recorder setting responds to keyboard
input by converting certain keystrokes into numeric values. The event
value always starts at zero. The event recorder responds to these
keys:
- Numbers from 0 to 9 convert to equivalent event values. Note:
pressing these keys places a marker in the file.
- The arrow keys: 'up' and 'right' add one to the current event value;
'down' and 'left' subtract one from the current value. No marker
is entered when arrow keys are struck.
- The 'home' key: converts to an event value of zero; no marker is entered.
Top of page
Breakpoint
conversions:
A 'breakpoint' conversion is a complex set of calculations in which different
equations are applied to input voltages depending on where they lie in relation
to a specified 'breakpoint' voltage. For example, you might apply a linear
conversion to all data of <2 volts, but a polynomial conversion for values
>= 2 volts. This window lets you set the breakpoint conversion
conditions:
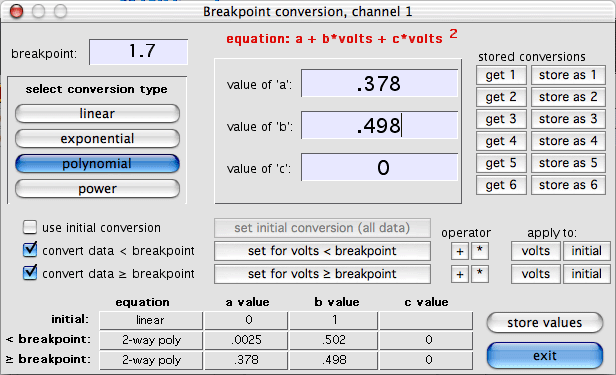
Each breakpoint conversion operation involves up to three different equations,
each of which can be linear, exponential, 2-order polynomial, or power.
The initial conversion is (optionally) applied to all data regardless
of voltage. The other two 'secondary' conversions are (optionally)
applied to data above or below breakpoint, respectively. The secondary conversion
can either be added to or multiplied by the results of the initial
conversion (this is selected with the 'operator' buttons) and can
use either raw voltages or the values from the initial conversion (selected
with the 'apply to' buttons). Note that the
breakpoint itself is always specified as a raw input voltage.
The window shows a summary table of the three equations at the bottom.
You enter the coeffients in the three edit fields at top center, and then
click the appropriate button to enter them into the initial or secondary
conversions. The 'get x' and 'store as x' buttons let you
save and retrieve up to 6 complete breakpoint conversions in
memory. To save them more permanently in a preferences file,
click the 'store values' button or use the 'store preferences'
option in the FILE menu. If you
save them in a file called "LabHelper prefs" and it is
located in the same folder as the LabHelper program, it will be loaded
automatically at startup.
Top of page
Conversion
options:
This lets you apply secondary conversions to your data; most of these
options are specialized for aerial respirometry. You can compute VO2 VCO2, or VH2O, using several basic conversion algorithms
(more comprehensive options for respirometry are available in the LabAnalyst
analysis program). Here is an example showing calcualtion of oxygen consumption,
with flow rate obtained from another channel:
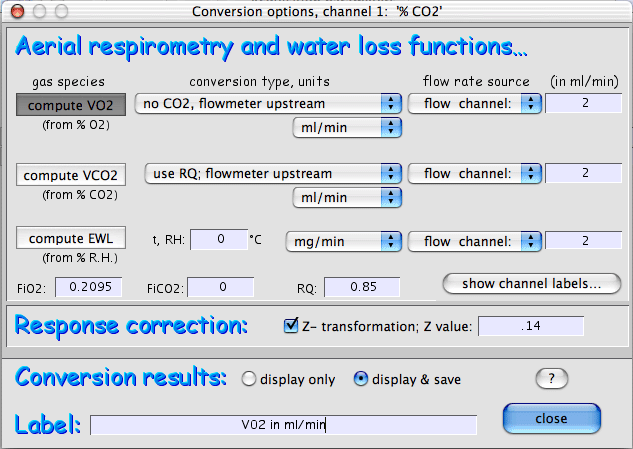
This example also shows use of the response correction (Z-transformation).
You have the option of showing conversions during acquisition but saving
the raw data only, or of saving the converted data.
pre-defined
conversions designed for commonly-used instruments can be selected from
the labeled buttons. You can create your own customized buttons and
conversion factors using the custom
conversions option in the EDIT menu.
When
using a DataTaker, a button labeled "°C (Cu-Cn thermocouple)"
is available (in the default mode). Clicking this button instructs
the DataTaker to return a compensated temperature (in degrees C), instead
of voltage. Note that if another kind of input device is used with
this option, erroneous data will be returned.
Direct Calibration button opens a window for keyboard
entry of values, which are then compared with measured voltages to produce
a conversion equation by linear regression, power function, or
2-order polynomial. The window shows the entered points, the regression
line and regression coefficient, and the conversion equation. At least
three points must be entered before a valid conversion is generated.
For each point, sent the instrument in question to a particular value, enter
that value in the edit field, and click the 'get voltage' button
(or hit return). Repeat as necessary with different instrument values.
Note that negative inputs (values or voltages) are not accepted when using
power functions. A display of the regression residuals is shown when
the residuals button is clicked. Here is an example (a 2-order
polynomial conversion is selected).
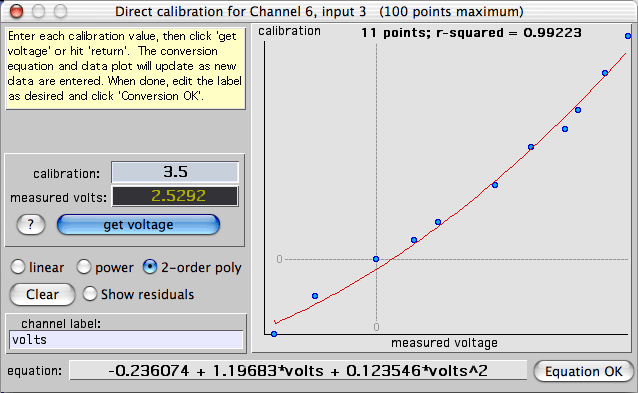
When done, click the 'Conversion OK'
button.
- Note that although entering voltage conversion equations can be tedious,
particularly for multi-channel sampling protocols, you can save conversions
in 'setup' files for immediate retrieval and re-use.
|
 Warthog Systems LabHelper X