 Warthog Systems LabHelper X
the Options window
using LabHelper
|
Warthog Systems LabHelper X
the Options window using LabHelper |
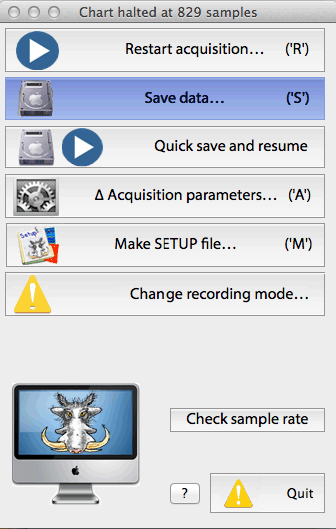 This window
appears whenever the ESC key is struck or the 'stop' icon is clicked during a data acquisition run, or
when the number of recorded cases reaches the maximum allowed. From
here, you can save your results, adjust program performance in various ways
(including changing the recording mode), use the help functions, or simply
resart data acquisition. This window
appears whenever the ESC key is struck or the 'stop' icon is clicked during a data acquisition run, or
when the number of recorded cases reaches the maximum allowed. From
here, you can save your results, adjust program performance in various ways
(including changing the recording mode), use the help functions, or simply
resart data acquisition.
Before opening this window, the program saves a backup copy of the recorded data (Chart and Scope+Chart modes only). The window title bar shows the number of cases that have been recorded (this number is not relevant in Oscilloscope mode):
In Chart (or Scope + Chart) mode, a small ancillary window indicates how the actual speed of sampling compares with the requested sampling rate. If scope data are being recorded, the requested and actual scope sampling rates are shown; actual rates are derived from the last full screen of scope data (obviously, this only works if at least one complete screenful of scope data has been obtained). Two examples are shown below. In the first (left) example, the chart sample rate was about 3% slower than requested and the user has been warned of this fact, and what the program will do about it. In the second example, the chart sample rate was within about .1% of the requested rate, so the requested rate will be saved with the file. Note that the program displays "Sample interval" if the interval between samples is 1 sec or more, but "Sample rate" if sampling is faster than 1/sec.
The OPTIONS window allows you to save recorded data, or perform several other important operations. The available buttons are:
It it now your choice to proceed anyway (losing the data) or save the data first. Hitting the 'y' or 'n' key is equivalent to clicking "yes" or "no", respectively.
|
| go to: |
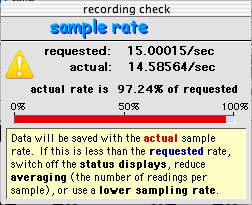
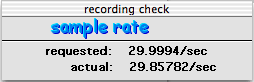
 chart file:
 SSCF file:
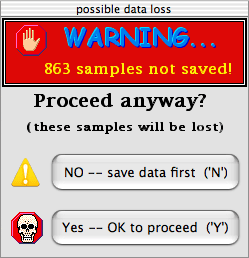 If data have been recorded
and an attempt is made to do something that will delete these data (such
as RESTART ACQUISITION, CHANGE RECORDING MODE, or QUIT, the
program will beep (or scream, depending on the sound settings) and show
a warning, as shown at right:
If data have been recorded
and an attempt is made to do something that will delete these data (such
as RESTART ACQUISITION, CHANGE RECORDING MODE, or QUIT, the
program will beep (or scream, depending on the sound settings) and show
a warning, as shown at right: