CUSTOM CONVERSIONS ⌘Z Dual windows, one for custom transfers and one for custom voltage conversions, let you make, copy, and optionally save specialized conversion sets for your own instrumentation. These sets -- with appropriate button labels -- can replace the default button options in the 'voltage conversion' window. There are two ways of handling custom conversions:
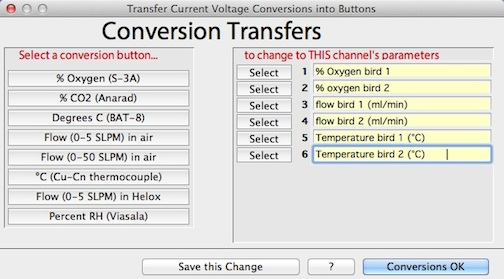
You can transfer your existing channel parameters into custom voltage
conversions, complete with buttons. To do this, select the "transfer
current conversions..." button in the initial selection window,
and the following window will appear:

Click the appropriate button to change, and the current channel
label and conversion values to use with the new button, and push the "save
this change" button. When done, click the "Conversions
OK" button. This option is not available for the 3-order
polynomial conversion. If you want your newly-transferred conversions
to appear as buttons the next time LabHelper is run, you must store
them by clicking the 'Save conversions' button in the following window.
 Alternately, you can directly enter the various parameters (a, b, and
c values, scaling limits, labels, etc.) in the custom conversions window
(this window appears after you exit the 'transfer conversions' window). Alternately, you can directly enter the various parameters (a, b, and
c values, scaling limits, labels, etc.) in the custom conversions window
(this window appears after you exit the 'transfer conversions' window).
By clicking the 'Save conversions' button, you can store the new values
in a preferences file. If you use the filename 'LabHelper prefs'
and store the prefs file in the same folder as LabHelper itself,
your selections will be loaded and used at startup. Alternately, at any time you can use the 'Save settings' button in the Preferences menu option to store changes.
The conversion parameters that can be edited in this window are:
- The button label
- The default channel label (30 characters or less)
- Whether the conversion is a 2-degree polynomial (the default; check the button in the 'poly?' column) or a power function
- The 'a', 'b', and 'c' values in the conversion equation
- The default minimum and maximum values for Y-axis scaling
- The additional terms in the 3-degree polynomial option
This sample custom
conversions window contains the default values, but you can enter your own
button and channel labels, conversions, and scaling limits.
RE-ARRANGE CHANNEL ORDER Lets you re-arrange the order of channels on the screen, and in any resulting data files. At the left side of the window is a list of existing channels (each with a 'next' selection button). Click the 'next' buttons in the order in which you want the channels to appear. When done, click 're-arrangement OK' (you can also cancel or start again).
CUT TEXT ⌘X CUT, COPY, and PASTE work
in the standard way, but only on text.
COPY TEXT ⌘C
PASTE TEXT ⌘V
PLAY SOUNDS ⌘A
Toggles the sound function. If sound is on, the program uses custom
sounds to call attention to important events. If sound is off, the
current Macintosh alert sound is used in situations when it is really
important to attract your attention..
- WEIRD
SOUNDS Activates or deactivates 'unusual' sounds
(screams, tire skids, etc.) to denote events. Some people get tired
of these -- hence the option to switch them off.
Top of page
DATA FILE INFO ⌘I
This option (available only if you are using the Warthog binary or Sable SSCF file formats) allows
editing of the comments and data stored with each file (in most cases, this
option is offered automatically when files are saved, but you can also access
it at any time from the Edit menu). Some specifics:

- the program can handle up to 32,000 characters of comments in Warthog
binary format -- far more than are likely to be necessary. The edit field
will scroll as necessary to accommodate your text.
- if your file is saved in Sable SSCF format, the maximum number of characters
is 240.
- the gas exchange data may not be needed for many files, but they are
very useful if you are doing respirometry and are analyzing your results
in LabAnalyst. Note that if you have corrected the flow rate data
to STP conditions (Standard Temperature and Pressure; zero degrees C and
760 torr), you should not enter real temperatures and pressures.
If your flow rate isn't corrected to STP, enter the ambient pressure and
temperature and LabAnalyst will use them to perform the STP adjustment
automatically.
- the 'Set To STP Conditions' button sets temperature and pressure to zero degrees C and
760 torr, respectively.
- effective volume is a measure of
the mixing and washout characteristics of a respirometry system. It is
useful if you are using the so-called instantaneous correction to compensate
for mixing and reveal short-term metabolic events.
Top of page
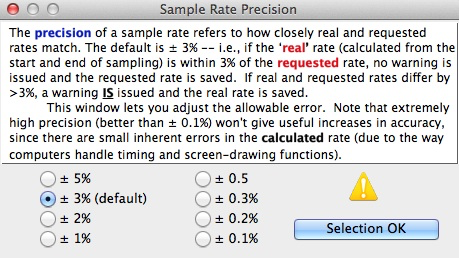
 RATE RECORDS PRECISION Activates
a window that lets you adjust the 'margin of error ' for saving the sample
rate of chart channels. The default is ± 3% -- that is, if
a "real" sample rate (as calculated from the time the recording
started and ended) is within 3% of the user's requested rate, then
the requested rate is stored in the data file. If the calculated rate
differs from the requested rate by more than 3%, an warning is shown and
the calculated rate is saved. This window lets you change the acceptable
error to values other than 3%.
| The following selections are only available after a recording mode
has been specified (either from the 'Recording modes' window or from
a setup file. |
CHART SAMPLE RATE...
⌘R
Opens a window that lets you set
the sample rate and recording time for Chart channels.
SCOPE SAMPLE RATE...
Opens a window
that lets you set the sample rate and recording time for Oscilloscope
channels
EXTERNAL DEVICE CONTROL...
⌘E
Opens a window that lets you specify
how digitally-activated external devices will be controlled during sampling.
|
 RATE RECORDS PRECISION Activates
a window that lets you adjust the 'margin of error ' for saving the sample
rate of chart channels. The default is ± 3% -- that is, if
a "real" sample rate (as calculated from the time the recording
started and ended) is within 3% of the user's requested rate, then
the requested rate is stored in the data file. If the calculated rate
differs from the requested rate by more than 3%, an warning is shown and
the calculated rate is saved. This window lets you change the acceptable
error to values other than 3%.