Digitizing data
Motion Analysis relies on the user to pick the points for digitizing. While often more dependable than automated position tracking systems, manual point selection is an easy way to give yourself a repetitive strain injury, since you are constantly using the mouse to move the cursor around the screen, select points, etc. So, be careful to use an ergonomically favorable work area (wrist supports, etc.) and stop frequently to rest.
 The program will periodically warn you to rest; you can change the warning interval (the default is 20 minutes) or turn it off with the RSI warning selection in the EDIT menu.
Digitizing points requires you to (1) find a position you want to digitize on the movie display (using the mouse or other pointing device to place the cursor on the desired position), and then (2) select it with a mouse click. To save wear and tear on your mouse hand, you can optionally select points by pressing the space bar; set this in the 'preferences' window (FILE menu).
In a small window below the movie image, the program displays the X-Y pixel coordinates, the absolute frame number, the frame count within the current event, the total number of frames digitized, and the elapsed time within the event.
![]() The Points per frame option in the DIGITIZE menu sets the total number of points that are digitized in each frame of the movie (1 to 5). If you select more than on point per frame, you are asked to specify the total length of the target and to determine segment lengths (each pair of points delineates a segment). Segment lengths are specified as a percent of the total target length.
The Points per frame option in the DIGITIZE menu sets the total number of points that are digitized in each frame of the movie (1 to 5). If you select more than on point per frame, you are asked to specify the total length of the target and to determine segment lengths (each pair of points delineates a segment). Segment lengths are specified as a percent of the total target length.
If you are tracking different positions on an object (like the head, midbody, and tail of an animal), the segment lengths help standardize where sequential points are placed. You have the option of 'locking' sequental points to fixed radii around the previous point, or drawing radii on the screen but allowing free point selection, or using no segment cues at all.
Note that if you have not done so already, you will be asked to set the spatial scale when you select more than 1 points per frame (click the 'controls' button for more information).
![]() Trajectory plotting is optional. When activated, it draws previously digitized points on the video image (only the initial point per frame is shown, even if you are digitizing more than one point per frame). Go to the 'CONTROLS' page for more information.
Trajectory plotting is optional. When activated, it draws previously digitized points on the video image (only the initial point per frame is shown, even if you are digitizing more than one point per frame). Go to the 'CONTROLS' page for more information.
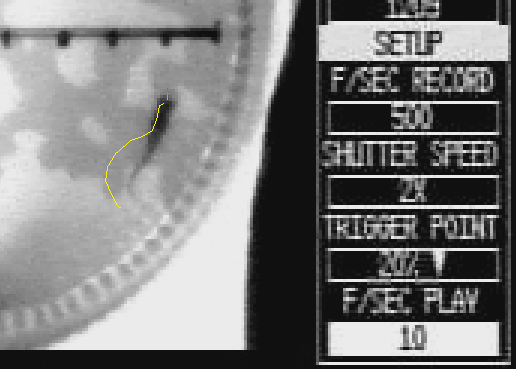
This sample image shows the trajectory of the snout of a guppy during a "C-start" escape response (filmed at 500 frames per second with a Redlake MotionScope camera). The trajectory from the start of the event is shown as a yellow line, the (faint) cross-hair on the nose of the fish shows where the next digitized point should be.
![]() The frame advancing options (DIGITIZE menu) determine whether the movie is advanced in single frames or in larger increments (2, 3, 4, or more frames). If you press the 'f' key, the movie will advance one frame. .
The frame advancing options (DIGITIZE menu) determine whether the movie is advanced in single frames or in larger increments (2, 3, 4, or more frames). If you press the 'f' key, the movie will advance one frame. .
![]() Reset to new event (EDIT menu) flushes the event buffer (optionally it will ask if you wish to save any existing data first) and resets all counters to zero. You use this option after finishing with one event so you can begin digitizing another.
Reset to new event (EDIT menu) flushes the event buffer (optionally it will ask if you wish to save any existing data first) and resets all counters to zero. You use this option after finishing with one event so you can begin digitizing another.
![]() The standard QuickTime controls (slider, frame advance/retreat buttons, etc.) are available, but you need to be careful about their use since they can introduce artifacts into event records. In general, use these controls only between events (and be sure to reset to a new event afterwards).
The standard QuickTime controls (slider, frame advance/retreat buttons, etc.) are available, but you need to be careful about their use since they can introduce artifacts into event records. In general, use these controls only between events (and be sure to reset to a new event afterwards).
back to the main Motion Analysis page