|
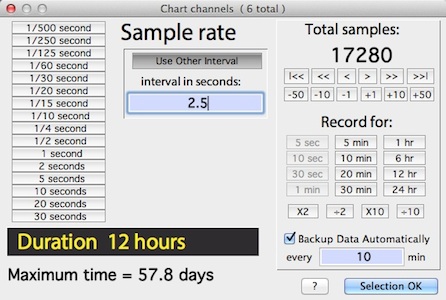
The SAMPLE RATE window offers a choice of button-selected sample
rates. You can also select any sample rate by entering the desired
rate (in seconds) in the edit field and clicking the 'Use
other interval' button.
 Note that not all
of the standard rates are always usable, depending on recording mode, A-D interface type, and the number of channels (the maximum sample rate drops as the number of channels increases). However, it's possible to select any sample rate
from the 'Use other interval' button. If the selected rate
is too fast for the number of channels used, the program shows a warning
message. If you ignore the warning and proceed, the program will attempt
to keep up but may not be successful. Data will be recorded and the
computer will calculate the attained sample rate (which may be slower than
desired) and display it at the end of sampling (see below). Note that not all
of the standard rates are always usable, depending on recording mode, A-D interface type, and the number of channels (the maximum sample rate drops as the number of channels increases). However, it's possible to select any sample rate
from the 'Use other interval' button. If the selected rate
is too fast for the number of channels used, the program shows a warning
message. If you ignore the warning and proceed, the program will attempt
to keep up but may not be successful. Data will be recorded and the
computer will calculate the attained sample rate (which may be slower than
desired) and display it at the end of sampling (see below).
When
you select a sample rate, LabHelper calculates the total recording
time and displays it at the bottom left of the window.
In Chart mode, you may adjust the desired
recording time (i.e., the duration of sampling) using the buttons
on the right side of the window. Click one of the available present
recording times, or increment the number of samples with the appropriate
buttons ("<<" and ">>" decrease or increase
the sample count by screenwidth samples;
"<" and ">" increment by screenwidth/2
samples, and "max" sets the sample count to the maximum possible
value. Some preset recording times may not be available because they would
require more than the maximum possible samples,
or they are too short for effective recording with the selected sample rate.
LabHelper will not allow you to specify recording durations of
less than 10 samples.
In Oscilloscope mode, you can use a similar set of
buttons below the trace duration box (lower left).
You can set the recording time for the minimum possible (one
screenwidth) to the maximum possible, in increments of 1 screenwidth.
If you are using an ADC-1 or DataTaker DT50/DT500, the maximum sampling rate is
about 3 to 4 samples/second (all channels combined). You can ask the program to sample faster, but voltage
conversion will not keep up. DT800s are considerably faster; go to this page to see how to get the fastest possible sampling rate from a DT800 (note that 'high-speed' mode is automatically selected if you request a sample rate faster than 10 samples/second). The Sable UI2 is the fastest currently supported A-D device (the UI3 should be faster but the software drivers limit it to about 62 samples/sec).
| In Oscilloscope mode, DT800s can sample intermittently at quite high rates (to 2000 samples/second) but this has severe practical limitations. Data are obtained in a 'burst' and then downloaded to the computer over the serial interface -- which is a very slow process compared to the burst sampling rate. For example, it takes 0.5 seconds to record 1000 samples at 2000 Hz, but it takes 5-6 seconds to transfer those samples from the DT800 to the computer. So what you see is intermittent 'snapshots' of the sampled data, not a continuously updated 'real-time' display.
|
If
you have set the alarm function
(see the A-D MENU page for details),
the maximum possible sampling rate decreases to some extent. However, for most sampling
rates, use of the alarm function has no negative effects.
When
data are saved, LabHelper will calculate the average sample rate from the total number of samples and the starting and ending times. If the average rate differs
by more than 3% from the requested rate, the average rate is saved in
the data file instead of the requested rate. This is displayed at
the end of recording; see the options window page
for details. You can adjust the precision
factor from the EDIT MENU.
In Oscilloscope
plus Chart mode, you are presented with the SAMPLE RATE window
TWICE. The first is for selection of the Oscilloscope sampling
rate. The second is for selection of the sampling rate for
Chart channels.
GENERAL CONSIDERATIONS
FOR SAMPLE RATES
LabHelper relies on software for timing, and it is
possible to disrupt the timing functions.
To maintain a consistent sampling rate, avoid 'distracting'
the computer during data acquisition, particularly at high sampling
rates. 'Distractions' include anything that causes macOS to temporarily
switch attention from running LabHelper to a different task. Some
hints:
- Do not insert removable media (this will temporarily slow or
halt acquisition while the computer mounts the new disk).
- Some storage media -- like certain external hard drives -- go idle after a
certain period of inactivity. If the switch to idle mode occurs in
the middle of a sampling episode, it's possible that sample timing will be
disrupted. To avoid this possibility, eject such disks before sampling
begins
- LabHelper will run in the background while other programs
are active in the foreground.
At most sampling rates and averaging counts, data gathering can proceed
with reasonable effectiveness in the background.
However, at high sampling rates, don't access other programs. This can slow acquisition to varying degrees.
| It's a good idea to shut down
screen-savers and especially the 'Sleep' function when LabHelper is gathering data. |
|
