The Feedback
control option (channel 2 only) lets you use the principle of
negative feedback to control an external variable (such as temperature,
flow rate, etc.). The computer reads an input channel to get the current
condition of the variable, compares it to a user-defined set point,
and adjusts the output voltage to the effector (a device -- such
as a heater or flow control valve -- that influences the variable of interest).
Note that the current condition and the set point are in converted units
(degrees C, ml/min, etc.) -- not 'raw' voltages.
The main advantage of using the feedback control routines is flexibility
and precision: you can specify a series of set points (up to 100) that occur
at different times. This allows pre-programmed control of complex
experimental conditions. It also helps insure that identical protocols
are used in repeated experiments, which is critical in maintaining consistency.
However, you need to remember that feedback control is abolished when LabHelper is
not running. More importantly, if the computer is unattended and a malfunction
occurs, the feedback
mechanism will fail, leaving the effector
in an unpredictable condition. In
some circumstances this could have very serious consequences. For example, you don't want to leave a high-wattage heating
unit in an unregulated condition unless you are willing to risk overheating
or even a fire.
Accordingly, feedback control should always be used
with caution, and whenever possible, with safety
back-ups that are independent of the computer (for
example, thermal cut-offs for emergency temperature control). |
Two additional caveats to keep in mind:
- The feedback routine uses analog output channel 2; you cannot
use this channel for feedback control and a voltage output script simultaneously
(you'll get a warning message if such a conflict exists).
- The computer can supply a low-current control
voltage only.
Top of page
To set up a feedback control system, you need to tell the computer what's
being regulated and how it should handle the regulation. As you enter
data, the script is shown graphically (see the example below). For
the script as a whole, you need to set:
- The slope of the feedback system (negative or positive).
Note that a positive slope does not indicate positive feedback.
It simply means that the signal to the effector must increase when the
regulated variable exceeds set point. For example, the output of a
cooling unit must increase if temperature is above set point, and this would
require a positive slope setting (in contrast, the output of a heater
must increase if temperature is below set point, and this would require
a negative slope setting).
- the regulated channel (the input channel that shows the current
condition of the regulated variable)
- the ending condition (at the end of the script sequence, at
marker 'x', etc.)
- the post-run set point (the set point after the script stops).
Click the 'enter values as the end state' button to set the post-run
conditions equal to the currently visible data. At any time you can
click the 'show' button to view the post-run conditions.
- the 'update interval', or how frequently the program checks
and updates feedback control. This interval can range from 0.25 to
30 seconds and is selected from the pop-up menu at the bottom of the window.
- Feedback scripts may loop back upon themselves, in which case
they will run indefinitely unless interrupted by an ending condition or
by the conclusion of sampling. A loop can return to any step in the
script using the 'loop to step' button.
For each step you need to specify:
- the set point and precision (± range) for the variable
of interest
- the maximum control voltage (the highest voltage that should
be presented to the effector; 0 to 5 volts)
- the minimum control voltage (the lowest voltage that should
be presented to the effector; 0 to 5 volts)
- the duration of the step (any duration may be entered, but time
is measured in units of 1/60 second so no step can be shorter than this).
When these data are entered, press the 'enter these values as a new
step' button to append the step to the script. As steps are added
or modified, the computer shows a graphical display of the current script.
You can modify a feedback script by first indicating the step to be changed
('edit step' button). You can then edit the step (by
changing the set point, etc. and then clicking the 'modify as above'
button) or remove the step ('delete' button). You can
also remove the entire script ('clear' button).
You can store and retrieve output scripts using the Open
and Save selections
in the D-A menu.
- CAUTION: using feedback may
slightly reduce the maximum possible sampling rate. At less than
maximal rates, it has little or no effect on acquisition speed.
Top of page
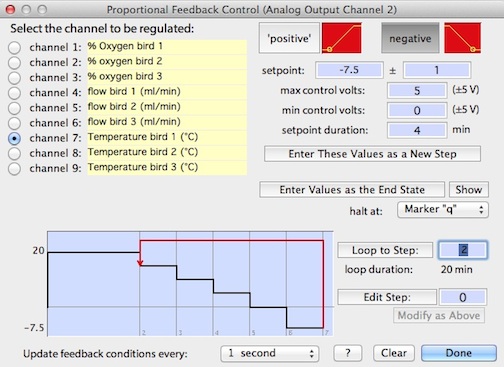
A typical feedback setup is shown at right:
In this example, we are using negative-slope feedback to control
temperature (channel 4). This means that as temperature falls below
the set point, an increasing control voltage is sent to the effector (here,
a heater).
The feedback script contains series of decreasing temperature set points,
starting at 20 C and eventually declining to -6 C before returning to 15
C. Each set point is maintained for several minutes and has a precision
of ± 1 C and a regulatory voltage range of 0 to 5 volts. This
means that when the temperature is exactly equal to (or higher than) the
set point, a control signal of 0 volts will be sent to the effector.
As temperature falls below set point, the control voltage to the effector
increases. When temperature is more than 1 C below set point, the maximum
control voltage (5 volts) is sent to the effector.
This script loops back to step 2 at the conclusion of the last step (step
6); it will stop when the 'q' key is struck. When not gathering data,
LabHelper will check and update the feedback condition every second.
